With my Conrail box car, I decided to go top down. I started with the roof, as you all saw a few days ago, then began working on the sides. I wanted to make the car look somewhere between beat to crap and been around the block a few times. This process was a bit difficult, due to the color of the car. The rust blended in with the brown in many areas, but with a darker mixture I was able to get a pretty good look on the car.
In the last post I wrote in detail how I prepped the car for this process. If you haven't checked that out, I highly suggest you do, and then pop back to this one. Beginning on the sides, I researched some pictures to get a good look as to how rust would build up on box cars. I used these three images I found on Pinterest for a rough idea.
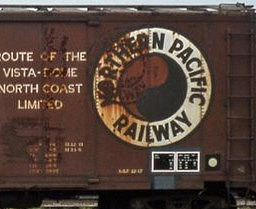
I really liked the Northern Pacific box car because it had roughly the same color as the the Conrail, so it was a big go-to for finding the best way to add weathering. I admired the GN car because some of the streaking looked like it was coming upwards. And the rusted up doors on the Penn Central caught my eye. Now that I had a reference to go off of, I began weathering my box car.
Noticing how the dark, old rust really showed up on the NP, I started making a mix with Testors' rust colored paint and a black acrylic. While eyeballing the mix, I made the mistake of adding too much black. This was easy to fix by adding some more rust colored paint. With the right combo, I grabbed my 1/8th inch brush and got to work. Starting off I didn't want a lot of paint on my brush, so I wiped the brush on a napkin. When the paint started to thin after a few strokes, I began lightly dabbing the brush in small areas. I wanted the car to look like it had some chipping spots that had been there awhile. This came out really well on the top section of the door.
In certain spots I went heavy for large patches of chipped away paint and rust. When I got around the Conrail logo I started using straight rust colored paint. This was the only spot you could really see that color. To finish off weathering the car, I added a small amount of rust streaks.
To make rust streaks I used a toothpick, paint thinner, and a 1/4 in. brush. Using a toothpick to dip into the rust color paint was perfect for adding small drops of paint on the top portion of the walls without it getting everywhere. I brushed off some of the excess paint thinner after dipping my brush in. If you use to much thinner it will just take all the paint off instead of streaking. With the right amount of thinner I did one simple pass starting above the paint and down the side. I didn't want the paint going all the way down so I stopped in the middle. Unfortunately, the red did not show up well again. Using the same method but with the darker mixture I was able to make some pretty good streaks. If you want to make a streak going upwards, like in the picture above, just start from below the paint and go up as far as you like.
If you guys liked this post please drop a comment down below and SUBSCRIBE to the page so that you can join the crew and keep up with all future TTMR posts! If you have any questions please drop a comment or send me an email! Also follow me on Insta and Pinterest as another way to stay on top of future postings! Thanks guys!


Comments